In this post we will show how to install a CD or DVD player in your car .
How to Install a Replacement Car Stereo | Audio Deck
Materials:
- Insulating tape or heat shrink spaghetti ;
- Cutting pliers ( or scissors ) ;
- Soldering Iron;
- Welding wire ( cartridge or roller ) ;
- Adapters (depending on car model ) ;
- sound-absorbing foam (optional).
Installation CD / DVD player is very simple, but can vary according to the device type and model of car . So you can make the standalone installation of the variables you need to understand what each one of the unit’s harness wires, which are identified by color.
Which should be on every wire CD Player whip?
Power wires:
- Yellow wire: Positive 12v battery, used to power the device;
- Red wire: On the ignition key of the vehicle;
- Black wire: negative 12v battery;
- Blue wire: (on some models may have a white stripe): Connected to an amplifier module, electric antenna, etc., used to remotely trigger any electrical appliance that must be connected with the CD / DVD player;
- Orange wire: Connected to car light switch, used to light the appliance lighting along with the car (only some models have this function).The DVD Players whips have the same wires, but come with a few strands more, such as:
- Light Green Wire: On the parking brake actuation, serves to trigger the video option. That is, for safety reasons, the video option is driven only with the car stopped, but to assist with the stopped car, just ground the green wire, or connect it to the negative wire;
- Purple wire: Connected to the vehicle reverse camera (or light aft), serves to switch the function of the CD player to the video backup camera.
- Yellow with black stripe wire: Used to get the audio from the DVD player can be connected to the aft camera, to improve concentration at the time of the goal and etc.

Fios dos alto falantes CD/DVD player:
- White : Positive from above the left front speaker ;
- White with black stripe : Negative from above the left front speaker ;
- Green: Positive high rear left speaker ;
- Green with black stripe :Negative high rear left speaker ;
- Gray: the speaker Positive Front Right ;
- Gray with black stripe : Negative speaker Front Right ;
- Purple: Positive the speaker Left Front ;
- Purple with black stripe : Negative speaker Front Left .
Installing the whip of your CD / DVD player properly:
The logic is plugging the same wires as yellow wire with yellow, black with black , etc., and it’s almost like that it works, but we have some variables in the connection of the yellow and red wires . For this , we must understand what for the red wire originally used :
The red wire is used to trigger the standby CD / DVD player ( stand- by) . For example , when you leave your radio on and off the car , the red wire will cause the unit is turned off as well. When you switch on the vehicle , the unit will automatically turn on .
One drawback is that we can not connect the CD / DVD player with the car off ( or without triggering post key position of the vehicle) . Moreover, in some cars , the red wire has its original inverted position on the connector with the position of the yellow wire . To resolve these “problems” we must first identify if my car positions are correct or are reversed.
How to identify :
Option 1 : Test with hum multimeter. LET the meter in position VDC (OU with hum signal like this : V = ) connect the black wire in the truck and go Chassis Connecting the Red wire nsa MULTIMETRO wires When Mark 12v , means that the FIO In Question E positive . To test the edge of the ignition key, simply press a post key position of the vehicle and go testing Also the SAME way .
- Option 2 : Connect wires OS Yellow together with red thread ( ONLY to harness apparatus ) together. Try Connect the CD / DVD with the Off Truck :
- If it does not turn , the position of the yellow wire 12v and red wire is reversed in the original whip ;
- If he calls , it is because the position of the yellow wire is “correct” (normal) .

After performing the test , you have two options for connecting the device :
Connect the yellow wires together, the more red the CD player, the position of the yellow wire is correct ; Connect the red wires together , the more yellow the CD player, the position of the yellow wire is reversed ;- I want the device off and then on with the car
Connect the same color yarn , the position of the yellow wire is correct Connect the red wire in yellow, and vice versa , if the position of the yellow wire is reversed .To make it easier to understand, see the wiring diagram :

Remember to isolate wires that you do not use , such as the blue wire if not using an amplifier or power antenna , and also the speaker wires , if not used (eg in pick- ups that have high rear speakers ) .

Now that we have information about the whips of CD ‘s and DVD players, we have to have some whip information we have in the car. If your car already came with a preparation for sound or an original CD player , to view whip may see a male connector .
If your car is the Fiat , Chevrolet and Volkswagen , this connector is called connector 16-way / male ISO . Therefore, to install your radio , just buy a female connector 16vias / ISO . But if your car is another brand and not have the connector 16 male way , you will have to buy an adapter , which usually has its own car name or brand, such as: connector for radio toyota female, female nissan radio connector and etc.
See the picture :

If the whip of your car is not 16-way , may have an obstacle to install a DVD player, as most of the lashes with the appliance come with a female connector 16 built -way , if your case will have to buy another adapter the male adapter harness 16-way . See the image as you should install ::

What can also happen is your car have cut whip or whip not have any . Thus you will have to identify the wires , or do it completely.
If check that the wires have the same colors as those cited in this post , it will be very easy as just follow the tips to directly connect your CD player . The problem is that usually the colors before the adapter is different (so the adapter helps a lot , because now identifies and standardizes the colors for ease of installation ), if the case, to identify the wires the ideal is to have a multimeter ( for the power wires ) and a common cell (to test the positioning of the speakers ( if they are already installed ) .
Tips to identify the wires from the speakers (no common color) :
- In some cars the color pattern is in stripes . Ex: 8 different colors of yarn, but it turns out that 2 with a red stripe ( 1 speaker ) , 2 with a white stripe (another speaker ) and etc ;
- Check the polarity of the wires usually darker wire is negative. Example pairs with a white stripe : one is pink (positive) and the other is wine ( negative) and positioning of the speakers (of the same stripe ) with a common stack (connect the battery in the wires and the speaker generates a noise
Install antenna in CD / DVD player Automotive Sound:
Regardless of the CD or DVD player model that you use , all have cable via signal input.
- If the original whip your cable has the signal via wire , you have to buy an adapter ;
- If the installation of an electric antenna is made , you have to connect the wire with an eye on the chassis , the wire is left on the remote blue wire CD / DVD player and cable in the device input.
- If done via cable, but not connect to the antenna input , you must use a simple cable adapter .
Veja na imagem:

Identifying and connecting RCA cables :
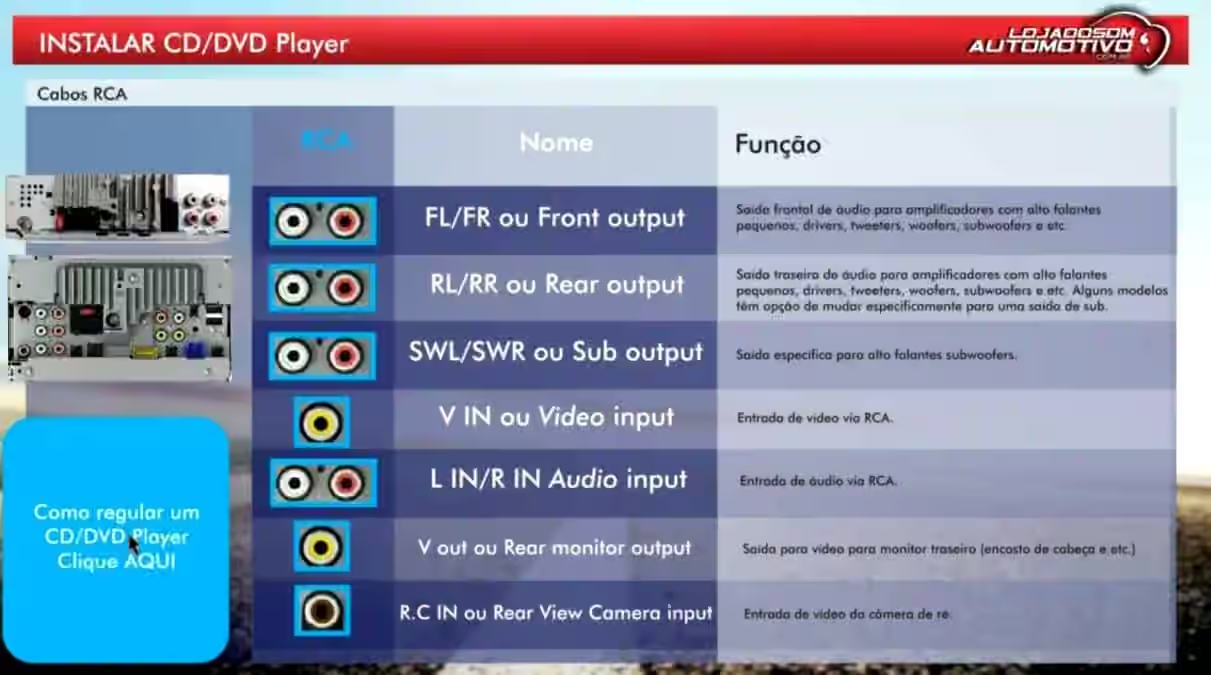
Putting the CD / DVD player on the dashboard
Each device comes with a metal strap around , remove it with the help of the keys that accompany the product , connecting them to the side. By pressing them , the locks will drop and you will remove the strap . Place the strap on the panel and fixed there , press the indentations to the sides ( not to be all).
Before connecting the wires , we recommend using a foam for automotive sound whip the cables and adapters to prevent noise .
Connect the wires and push the device. Remember to allocate a space behind the machine so it does not get out of the panel. This tip is very important for DVD players that are generally larger and some models need ventilation.
Lock it in place , test it and voila! The CD / DVD is installed.
Leave a Comment